Showing posts with label plates. Show all posts

12.02.2011

From the Archives - Decoupage Fabric Plates

Every so often, I like to post popular tutorials from my archives - here is a full tutorial on how to make decoupage plates, using clear glass plates and cotton fabric. Don't let the Yankees fabric fool you, I am a proud Boston Red Sox fan!
 
I'll be posting some holiday plates this weekend that I have recently made, to give you some ideas for gifts. These are great for cookie swaps, neighbor or teacher presents also. 

Here's what you will need to complete this project: 

  • Round or square glass plates
  • Cotton fabric, in any design
  • Modge Podge, regular or with glitter
  • Scissors
  • Table covering
  • Paint cans to hold the plates while they dry
  • Matte or gloss clear spray paint


Start by finding some inexpensive glass plates, either at the consignment store or home goods store. Wash them and dry them completely. Next, cut the fabric about 1-2 inches wider than the plate you are using.

Put your first plate face down on a paint can and the piece of fabric face down on the table covering. Cover the back of the fabric with Modge Podge, flip it over carefully and cover the front generously as well. Then, lift the fabric off the table and place the design face down so that the design of the fabric is facing out (see picture). Use additional Modge Podge if necessary.

Use your hands to work out any air bubbles in the fabric, from the center out. Depending on the thickness and texture of the fabric, this may take some time. Move the plate to another paint can to dry thoroughly. Modge Podge goes on white and dries clear so you will be able to tell when it is ready for the next step.

Repeat for as many plates as you have. I made 3 New York Yankees plates, a gray & pink bird plate, which are both in my Etsy Store and a black striped plate, which didn't turn out the way I wanted and was scraped before the final step. Here is a production picture of them drying.

Once dry, carefully trim the excess off with a razor blade so that the edge is flush with the plate. (step not shown) 

In a well ventilated area, place the plates face down again on the paint cans. Using your clear spray paint, spray the backs of the plates completely. 

Finally, clean off any excess glue or fingerprints on the front with glass cleaner and paper towels. 

When you are all finished, your plates should look like this:

 
Happy Crafting - feel free to send me a link or picture if you try this project!

6.13.2011

From the Archives - Decoupage Fabric Plates

Every so often, I like to post popular tutorials from my archives - here is a full tutorial on how to make decoupage plates, using clear glass plates and cotton fabric. Don't let the Yankees fabric fool you, I am a proud Boston Red Sox fan!

Here's what you will need to complete this project: 

  • Round or square glass plates
  • Cotton fabric, in any design
  • Modge Podge, regular or with glitter
  • Scissors
  • Table covering
  • Paint cans to hold the plates while they dry
  • Matte or gloss clear spray paint


Start by finding some inexpensive glass plates, either at the consignment store or home goods store. Wash them and dry them completely. Next, cut the fabric about 1-2 inches wider than the plate you are using.

Put your first plate face down on a paint can and the piece of fabric face down on the table covering. Cover the back of the fabric with Modge Podge, flip it over carefully and cover the front generously as well. Then, lift the fabric off the table and place the design face down so that the design of the fabric is facing out (see picture). Use additional Modge Podge if necessary.

Use your hands to work out any air bubbles in the fabric, from the center out. Depending on the thickness and texture of the fabric, this may take some time. Move the plate to another paint can to dry thoroughly. Modge Podge goes on white and dries clear so you will be able to tell when it is ready for the next step.

Repeat for as many plates as you have. I made 3 New York Yankees plates, a gray & pink bird plate, which are both in my Etsy Store and a black striped plate, which didn't turn out the way I wanted and was scraped before the final step. Here is a production picture of them drying.

Once dry, carefully trim the excess off with a razor blade so that the edge is flush with the plate. (step not shown) 

In a well ventilated area, place the plates face down again on the paint cans. Using your clear spray paint, spray the backs of the plates completely. 

Finally, clean off any excess glue or fingerprints on the front with glass cleaner and paper towels. 

When you are all finished, your plates should look like this:


Happy Crafting - feel free to send me a link or picture if you try this project!

5.01.2011

Personalized Angel Birthday Gift

Sometimes craft orders come from the strangest places - recently we've been doing some work on our house and the subcontractor asked if I could make a birthday gift for his girlfriend. He mentioned that she liked angels and asked me to create a pillow to match this Amazing Grace plate - 


I didn't include any tutorial tips with the pillow because I figure those are easy enough to come by.


A view of the embellishments from the top.  


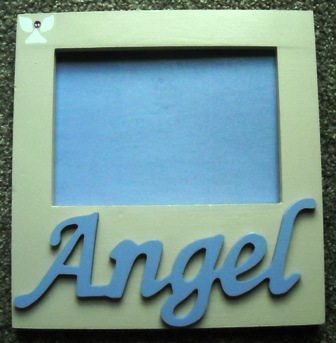
He happened to mention that her favorite color is purple and her nickname is Angel so I created a personalized frame for a picture of the cute couple. I am going to post a mini-tutorial of this soon. 


Trying to think ahead, I decided I should take of the gift wrapping for him as well. I managed to be done way ahead of deadline (tomorrow) and I think he'll be pleased that the wrapping is done. 


I hope this Babycakes creation is a hit - I'll be sure to let you know how she liked it!

4.04.2011

Modge Podge Monday

Happy Monday! In honor of the decoupage plates that I am making this week, I thought it would be fun to post some decoupage plates projects that are totally different from mine, to give you more ideas for your next decoupage project. 

This one I discovered around Valentine's Day but it will work with other colors and designs. Using tissue paper, doilies (always a fun thing) and any message you want. It comes from Paint Me Plaid and the full tutorial is here. 


Using an easy silhouette technique and vintage plates, which will soon be easy to find as tag sale season is around the corner, this vintage cameo plate tutorial is from Prudent Baby. A great idea for the upcoming Mother's Day holiday.


I have been toying with the idea of making a plate for our friends who are getting married in July. I have more than enough wedding fabric, white with delicate little wedding designs like hearts and "i do" all over it. I also picked up a package of wedding stick-ons from Michaels last month. You can pretty much do whatever you want with this idea; use wedding fabric, their colors or pictures of the happy couple. Here is one idea from 'I Do' It Yourself - Wedding DIY decoupage project.


And finally, here is an idea I never would have thought of but it's perfect for Spring with bright colored paper and an overall happy feel to it - just try not to smile looking at it! The full tutorial is available by clicking here and be sure to visit the site KatydidandKid for more fun projects.


It would be silly to post about anything related to Modge Podge without sending you over to Modge Podge Rocks. She shows fun & easy tutorials as well as posting often with new projects. 

My night holds a half dozen decoupage plates, a set of 4 coasters and week 3 of Dancing with the Stars. Enjoy whatever you are doing this evening!

2.25.2011

Babycakes Book Recommendation

This book has been out for a few years but it's still one of my favorites.


The Big Ass Book of Crafts
by Mark Montano

My husband surprised me with this book - it's full of interesting and inspiring ideas for the home and for gifts. 

One of the projects I tried was the silhouette painting. I used a clear glass plate, black acrylic paint and gold spray paint. Try experimenting with different colors and silhouette shapes. Here is one of my finished plates:


I taped the picture to the front of the plate, traced the silhouette with a black paint pen and then filled in the design with black acrylic paint. Once that dries, hold it up to the light to make sure the black paint covers all of the design, if the design is complete, cover the back with spray paint in light layers, until you get the desired effect. 

Have a great weekend - happy crafting!