Showing posts with label babycakes crafts. Show all posts

2.24.2012

Taking a Break

As our sweet little baby Cameron prepares to turn 6 weeks old tomorrow, I've finally made the decision to take a break from blogging. I know my posting has been scarce lately anyway but I figured it's time to make it official. Other than working on his scrap book while he is sleeping, I haven't had time to think about crafting and that's fine by me. I am enjoying every second with this little guy and while my hubby has been great about keeping up with the house and doing most of the cooking, I am finally getting back into the swing of things (and only needing to wake up for one overnight feeding!) and crafting just doesn't fit in right this second.

I'm hoping the tutorials I've posted will continue to help others with their own crafty projects and gift ideas. And I promise to post any news or baby projects as soon as I have time to start working on them again...


Until then, I leave you with this adorable picture - this kid really is a good sport about my constant photo taking!

2.01.2012

Happy Baby Cameron

Can you blame me for not exactly thinking about crafting lately? Look at this face! 

  
This little guy is changing our lives for the better, each and every day. I plan on working on his scrapbook some more this weekend and will post an update soon. Hope you are all having a great 2012 so far - can't believe it's already February! 

1.21.2012

Welcome Baby Cameron

I'm sure you will forgive me for the brief break I'll be taking from the blog - I'm happy to introduce the newest addition to our family...

Cameron Austin

Born: 1/14/12
Weight: 7 lbs, 3 oz
Length: 19.5 in

1.07.2012

Pregnancy Update - Winding Down

I guess it's obvious that I haven't been as crafty as normal lately. Don't get me wrong, I have all kinds of great ideas and inspiration but my brain has been in full-on baby mode! With only 4 days until my due date, I'm getting increasingly anxious...

The last couple weeks of pregnancy seem to be taking forever, it's hard to sleep and every time we go out, I can't help but think "what if it happens while I'm in line at Kohls, or the bakery, etc" Luckily everyone around me has been very understanding and is humoring my neurotic tendencies, especially my wonderful hubby.

I know this little guy will join the outside world when he's good and ready but it doesn't make me any more relaxed.

So, thank you for understanding my lack of posting lately - I'll be sure to update as soon as there is any baby news and also share any projects I come across from my fellow, talented crafty friends.

Hope 2012 is starting off great for all of you!

12.31.2011

Happy New Year!

Here's wishing you all a happy, crafty and healthy 2012! May the new year bring you much joy - I know I can't wait for the new year and our first child to get here - 11 days and counting! I'm sure he'll give me much inspiration for new craft projects to share with you all. 


(Image source: www.crafts.kaboose.com)


12.23.2011

Happy Holidays from Babycakes Crafts

Babycakes Crafts will be taking a few days off for the Christmas holiday - hope you all enjoy this weekend, no matter how you choose to celebrate!

12.19.2011

Holiday Baking Plans

Last year, I went all out with my cookie baking and candy-making but this year, I'm scaling things back just slightly. The two-toned twisty candy cane cookies just aren't happening this year! Here is last years platter of goodies: 


This year, I'll be tackling the chocolate covered Oreos (as seen above), M&M cookies and only one type of chocolate bark (skipping the almond one this year).

If you are interested in making the candy cane cookies, here is a great recipe from The Etiquette Factory Blog. It's described as a "basic sugar cookie with a little something extra" and they freeze well so technically you could make the dough in advance and then cook them right before Christmas. These were always a favorite growing up in my house but I don't think I have the energy to make them considering the M&M cookies almost killed my feet the other night. 

I don't think I need to include the M&M cookie recipe since it's pretty much the same one as the chocolate chip cookie recipe on the back of Nestle Tollhouse Morsels, except instead of adding chocolate chips, you bake the cookies for 8-9 minutes, take them out and add the M&Ms, then put them back in the oven for another 2-3 minutes. You shouldn't put the candies on until they are mostly done baking or they will melt and look terrible. 

Peppermint candy bark is another really easy but impressive thing to make for the holidays. It's simply 
  • one bag of chocolate chips
  • one bag of white chips
  • crushed up candy canes and 
  • peppermint extract (optional)

Line a cookie sheet with parchment paper or wax paper, pour the melted chocolate chips to make a thin layer covering the bottom and let it solidify. Then melt the white chocolate chips (adding the peppermint extract for extra flavor) and drizzle all over the top. Then sprinkle your crushed candy canes over the top so that they will harden into the white chocolate. You can also add the candy canes to the white chocolate first if you prefer and make a full second layer. Put the pan in the freezer for about 20 minutes, then remove and break into pieces.

A tip: put candy canes in a thick Ziploc bag and crush them with a meat tenderizer (smooth side). Don't try to put them in any appliances such as a blender, coffee grinder or food processor. 

Finally, making Chocolate Covered Oreos is easy but looks like you spent hours in the kitchen. Using these fun molds from Wilton (only $2):


along with candy making chocolate that you can find in any craft store, you can make these treats for a fraction of the cost of buying them in fancy chocolate shops. I use white chocolate for the designs, so I can color the trees green or the bulbs red and blue. Once the design is filled in (or not - as seen in the plain chocolate Santa above), you just add a thin layer of chocolate, add the cookie, pressing down slightly and then cover the bottom with more chocolate. I was going to skip these this year but my in-laws loved them and I couldn't disappoint!

What kinds of fun, holiday baking do you have planned?

12.11.2011

Handmade Christmas Cards

Every year I make a dozen or so handmade Christmas cards to sell as add-ons at my holiday fairs. This year, I made a few extras so that I could send them to family and friends. I have to admit that I don't make too many paper crafts and I bought  a lot of pre-made scrap booking supplies for these particular cards. Here are some of my favorites:


It has taken me about a week to get all these cards ready to go but they will finally be going out in the mail tomorrow. As for today, Bunch and I are hanging at home and enjoying the last free weekend day that we will have before the holiday partying starts next weekend - watching Christmas movies and enjoying our tree. 


Not that things will slow down after the holidays since then the Countdown-to-Baby starts!

12.07.2011

How to Make Tile Coasters

Here is a fun project that will make a great gift for the upcoming holiday season! Follow this easy tutorial and in one afternoon, you will have a wonderful gift for neighbors, co-workers, teachers, etc! Or pair with a bottle of liquor or 6-pack of beer for the guy in your life - they are always so hard to buy for :)

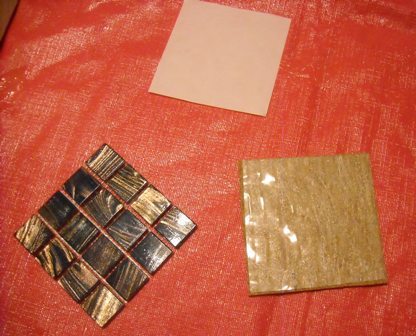
Here are my supplies, as seen in the picture: 

  • Tiles - any size, any style (the ones I used are 1x1 inch, already spaced - from Home Depot $4.99, in blue & brown)
  • Tile setting mat - sticky plastic to hold the tile in place
  • Cork board - this should be sturdy, as it will be the base of the coaster
  • Grout - any color, feel free to experiment
  • Float - to spread the grout (these can be found at Home Depot)
  • Sponge - to clean off groat after is has dried 
Not shown:
  • Scissors 
  • Table covering
  • Plastic gloves 


The first step is to determine how big you want your coasters to be. I decided on 4 x 4 rows, cut that and then cut the tile placement mat and cork backing to match. 


Then, with the cork on the bottom, line up the tile sticky mat and place that on top to match, finish by securing the tiles to the top, like this: 


Because we are using the tile placement mat, there is no need to wait between setting the tile and applying grout. For this project, I used a sandstone colored grout. With your gloves on to protect your skin, use your float to start filing in the grids of your coasters. 

After finishing the top, you'll need to go back and carefully fill in the sides with grout as well. This will require some light sanding after you are done.


When I was finished with both sets of 4, it was time to let them dry and rest up!


I made the rookie mistake of leaving the grout on too long but the good news is that it will still come off. The bad news is that the scrubbing required some extra time and elbow grease. 


Here is one of each of the finished coasters.


And finally - the finished product! Replace the pink and blue ribbon that I used with a fun holiday ribbon and stick in a few small ornaments decorations or Christmas flowers instead.


12.04.2011

Holiday Decoupage Plates

To follow-up on my decoupage plate tutorial, I wanted to share some holiday plates that I've recently made. 

Classic Poinsettia

Gingerbread Men

Christmas Kitties

 
Glittery Snowflakes


Christmas Dogs w/ lace trim
(the glitter Modge Podge I used for this one didn't photograph well)

Which holiday plate is your favorite?

11.29.2011

Lack of Posting - I Can Explain!

Hello all - I guess it's not a big secret that my posting has been a little lax lately. As I round the 6 week Countdown-to-Baby, I'm getting slower all around. Not only am I getting winded when I walk up the stairs too quickly (sad but true) but my craft projects have slowed to a halt. The craft fair that I attended a couple of weeks ago went well, although I was surprised that my newest creation, the Ice Skate Centerpiece did not sell, despite a lot of compliments. Oh well, it will look great in our front window this holiday season!

The most creative thing I've done this week is to start some hand-made Christmas cards (I typically do half homemade and half out of the box) and try to come up with some fun and easy little craft projects that I can add onto the gifts I've already bought. Yes, I'm that person - my shopping has been done for weeks.

One of the projects I would like to attempt this week, since I should have some extra time, is a Reindeer Car Costume, like this one: 
I haven't found many tutorials online so I would like to try and make this with items I already have in the house and post the process for others to try as well.

All I can say is that it's a good thing this baby is due after the first of the year or I would definitely be making him wear this to match the car: 


Thanks for your patience while I get back to crafting, in the midst of packing my hospital bag, washing a million baby clothes and linens in Dreft and training my replacement for maternity leave.

How are all your holiday projects coming along? Can you believe it's only 25 days until Christmas?

11.23.2011

Happy Thanksgiving from Babycakes Crafts

I hope you all have a safe and happy Thanksgiving holiday - watch this page for some fun, new holiday craft tutorials, coming soon! 

11.18.2011

Weekend Craft Fair Info

Holiday Craft Fair Announcement

Who: Babycakes Crafts and 50+ craft vendors

When: Saturday, November 19th, 2011

Where: Wilcox High School, 298 Oregan Road, Meriden, CT

Time: 9:00 a.m. - 3:00 p.m.

Raffles, bake sale, handmade gifts and more...

11.11.2011

Diaper Cake Tutorial (Baby Shower Weekend)

In celebration of my baby shower being held this weekend, I thought it would be appropriate to post a tutorial for a project that just about anyone can do, not matter what their craft skills may be.

Diaper cakes are a cute and crafty gift, perfect for a mommy-to-be, no matter what gender her bundle of joy will be. Here is a simple tutorial if you would like to try one of these for a pregnant friend or family member. 

This picture of the supplies is not exactly organized but here's the basics on what you will need: 

  • Disposable or cloth diapers; decide how tall you want the cake to be or how much you want to spend, that will determine how many diapers you buy
  • A cardboard base; you can buy cake boards or cut a piece of study cardboard and cover with cute wrapping paper
  • Ribbon; choose your colors based on the gender and make sure to have many different widths 
  • Clear elastic bands to secure rolled diapers
  • Rattles, socks, lotion, pacifiers - extra items for sides of cake
  • Glue gun, tape, scissors, flowers, and wine (for drinking, not decoration!)
  • Cellophane and ribbon for wrapping
The first step is to glue lace around the bottom cardboard base and then start rolling some diapers! 

We used 52 for this cake and it took us about 15 minutes to roll them all. I was initially going to roll them and have Sandy tie them with ribbon but it would have taken too long. A quick trip to the store led us to the clear hair elastics in the picture and still saved about 45 minutes. 

After the diapers are rolled, start lining them up on the base, with the edge facing in, until the outside of the board is covered in a ring of diapers. You may need to use a smidge of rolled tape under each to keep them upright while you are working. We stuffed the center with tissue paper but if you have enough diapers, you can use those to fill the entire circle.

Then, place a slightly smaller cardboard circle on top of the bottom level and repeat the process. We tied some ribbon around the bottom layer while we worked but it's just a temporary hold. The cake isn't sturdy at this point but you can secure it all once the diapers are in place.

Repeat the process from the first layer on the second and third (if applicable). 

If you are using cloth diapers, you will find that as few as 30 will make a full, two tier cake but that will mean your cost could be significantly higher. 

After we finished all three layers and wrapped the layers with thick, wired ribbon with smaller magenta ribbon on top, secured with hot glue, we realized that the top layer was too full (the picture on the side is  the goof-up before we fixed it). There was not enough of a difference between the middle layer and top layer so we simply pulled out one of the diapers from the top layer and pulled the ribbon tight with hot glue for security. Try not to get any glue on the diapers.

 You can see there is one diaper left over in the middle, we used that and the diaper that we removed from the top layer, to hold a bottle of baby lotion in place on top of the cake, creating the illusion of another tier. 

Once we fixed the top layer and positioned the lotion bottle, it was time to adorn the sides of the cake with teeny tiny socks, a package of pacifiers, a rattle (shaped like a diamond ring for the little diva!), small flowers and an adorable star washcloth, with a happy face to celebrate the joyous occasion! 


Of course you will want to cover this cake to protect the diapers, now that they are out of the package. We used rolled cellophane and some ribbon to complete the gift. This also keeps the cake more secure for traveling as well. 


The finished project cost approximately $30 for all the supplies. You can adjust the size of your own cake project based on your own budget. The recipient will certainly appreciate the thoughtfulness of this personalized gift, no matter how much you spend. Happy crafting!

11.01.2011

Programming Note


For the second time in as many months, we were without power due to inclement weather here in New England. Thankfully, we are powered up this time a lot quicker than last and we've had heat the entire time. 

Please hang with me while I get the house back in order (hello, laundry!) and get back to my crafty posts. Hope you are all doing well, wherever you are - thank you for understanding!

10.24.2011

Autumn in New England

In between a lot of baby prepping, I've been trying to get some projects done for my upcoming craft fair in November. I promise to post tutorials and updates soon! While I'm busy doing all this, I'd like to share some pictures from our latest trip to Stowe, VT. There is nothing quite like Autumn in New England!


How are you enjoying the Fall season wherever you are?