Showing posts with label Spring projects. Show all posts

6.14.2011

Crafty Links - Babycakes Approved

Happy Tuesday everyone! I know I've been light on new crafting projects but check out these great ideas in the meantime... 

6.01.2011

From the Archives - Crafty DIY Bird Feeders

I'm using all my might to "wish away" the impending storm, set to hit parts of New England. While I sit here and hope that the tornado activity stays away from CT, here's one of my favorite posts from the archives:

Here are a few of my favorite tutorials that I have discovered for making your own crafty bird feeder.

First up is the idea that inspired my post today - a fun project with a rustic feel & nature-friendly results via Cassy as of Lately. The best part is you probably already have everything you need in the house!

This cute idea I recently came across is an easy weekend project and would work perfectly if you have young kids around. Courtesy of My Own Ideas, click here for the tutorial to make these pretzel birdie treats. 


Another fun idea to do with the family, requires simply a bag of bird food, gelatin, twine and some fun shaped cookie cutters. (Alpha Mom)


And my personal favorite, because I love any teacup and teapot related crafts, this tutorial comes from Tip Nut.


5.24.2011

Crafty Links - Babycakes Approved

Every Tuesday, I love to share links to projects I have found throughout the weeks - here goes! 

  • This is a great idea that would work for Father's Day dessert as well - Key Lime Cake courtesy of The Lettered Cottage, who was kind enough to share this family recipe.

5.15.2011

Fabric Decoupage Bangle Bracelet

A couple of weeks ago, I posted a tutorial on how to make decoupage bracelets with magazine cut-outs and with tissue paper. Here is a twist on that tutorial - using fabric strips instead. 

Here are my starting supplies - an inexpensive bangle bracelet (kids size), strips of flowered fabric, scissors, white fleece to add shape and Modge Podge (not shown).


I started by adding a strip of white fleece to the outside of the bracelet to give it some extra padding, so it won't require as much fabric to build it up. Don't worry about cutting too carefully, just make sure the ends meet up and the whole top of the bracelet is covered. 

I use my hands for the next part, even though it is messy - start covering the fabric strips in Modge Podge (in plastic cup above) and cover the bracelet. Smooth over the edges with extra Modge Podge and keep going until you get the desired look. 

When you are finished, you can cover any edges on the inside of the bracelet with a piece of 3/4 ribbon. I used a fuchsia colored ribbon and covered it in Modge Podge to adhere. You may have to run your finger along the inside a few times, to make sure it covers all edges and looks smooth. 

For a finishing touch, I added a few cloth white flowers, attached with Tacky Glue. 


I was very pleased with the way this project turned out - it would make a great gift and it's an easy afternoon project. If you are interested in this particular bracelet, please visit my Etsy store


Tip Junkie handmade projects

5.08.2011

Happy Mother's Day

Happy Mother's Day from Babycakes Crafts!


To all the moms, grandmas, great grandmas, moms-to-be, step-moms and all the wonderful women who are celebrating today - enjoy!

5.06.2011

Crafty Weekend Plans

It should come as no surprise that my weekend crafting plans involve Mother's Day gifts! I will be attempting to make the following projects, hopefully with fabulous results. 

Since we usually buy plants for our mom's, I thought it would be fun to make a knock-off of these adorable planters from Amazon
These little guys are $120 but I'm guessing that with some chalkboard spray paint, a few inexpensive Terra-cotta planters and chalk - I should be able to make 2 for less than $12. 

And I've bought all the ingredients to make some yummy hand scrub too. Hopefully mine will come out half as cute as this jar by DIY Beauty


Lastly, I would like to bake something fun and special (if time should allow) but I'm not sure what yet...

Is there any chance I can come up with anything this cute though? These fancy cupcakes were shared by The Caffeinated Globe


What kind of fun & crafty projects are you working on this weekend?

5.05.2011

Embellished Wood Picture Frame

Here is a fun and easy tutorial, a follow-up to the gift basket I delivered this week, on how to make a customized frame as a gift for just about anyone. 

I went to my happy place - Joann Fabrics - and found a fun, inexpensive frame to start with (always remember to bring your 40% off coupon!) and a wood cutout of the word "Angel". You can use any cutout word that you like or buy single wood letters to spell anything you want. 

I started by going to a well-ventilated area and spray painting the Angel cutout in a light purple. 

Before
After

While that sat outside and dried, I went to work on the actual frame. I used just a bit of fine sandpaper to make sure it was nice and smooth before painting. 


Once the frame and cutout was dry, I affixed them together with wood glue and decided that the frame needed a little something extra, without going overboard. Yes, I have the tendency to add a ton of glitter or colorful gems to whatever project I am working on. But in this case, the recipient was described as a little less flashy so I went with a very simple angel in the corner. Using a purple gem for the head and drawing the wings and body with a white paint pen, it looked exactly as I had hoped!

And finally, the finished product...


Today is the birthday of the girl that I made this for so I hope she enjoys her gift basket and has a wonderful day!

Tip Junkie handmade projects

4.27.2011

Inexpensive Mother's Day Ideas

Mother's Day is less than two weeks away and let's be honest, mom's love anything that their children make so here are some creative ideas to get you moving!

Find a creative saying or famous quote and make your own card. This card is a good example - I find it to be hysterical personally. (available for purchase from doodlelove on Folksy - she has a ton of amazingly cute cards)


Perhaps you are planning to cook for Mom? Try making Overnight French Toast Casserole from Mommy's Kitchen - how appropriate. This happens to be my mother-in-laws signature dish...


If you are looking to give your mom all the pampering she deserves but without the costly price tag, considering making her a spa basket with homemade body scrub made with Burt's Bees body oil, recipe courtesy of Martha.

Do you have any fun and frugal ways to celebrate mom this year? I would love to hear them - please comment below.

4.23.2011

Easter Baking & Candy Making

Today ended up being a bit more exhausting than I thought it would be! I started that day by recreating this delicious chocolate peanut butter egg candy recipe from All Things Fabulous


Bunch just cut one open to test it and gave them two-thumbs up. Phew!


One Easter tradition that I love having? Making pizzelles! Since I used a perfected recipe that has been handed down to me, I can't share that but this is where my afternoon started...


And this is the finished product. Just need to bag them up for the neighbors and our many stops tomorrow.


Time to clean up and get ready for a big day of visiting, good night!

4.22.2011

Mad Men Spring Floral Arrangement

And this is what happens when I have the day off and my imagination runs away with me. I'm going to go so far as to say this Mad Men flower arrangement is definitely one-of-a-kind!


I had the vases left over from our wedding reception centerpieces and the flowers were from an arrangement I got this morning. From left to right, Betty Draper with her pearls and apron on, dashing Don Draper in his suit & tie, Peggy in the middle with her classy, no fuss get-up, and finally Joan in her signature red and dapper Roger Sterling are on the end. It might seem like a waste of time but I had fun and that's all that matters. If you had the day off today, I hope you enjoyed it too!

4.19.2011

Crafty Links - Babycakes Approved

I always look forward to Tuesdays because it's link day and I can share some of the creative projects I've stumbled upon in the last week - 


As always, support your fellow crafters and buy handmade!

4.16.2011

Simple Paint Chip Projects

I decided a long time ago that the most fun part of any home improvement project, besides the completion, is picking out paint colors! While I spend the weekend tormenting Bunch with carpet samples and trying to find the perfect accompanying paint shade, I wanted to share some inexpensive paint chip card crafts from some very creative people: 


Or try this simple Easter garland, a perfect project for kids too! Check out Modern Parents, Messy Kids for more projects for the little ones.


And finally, here is a project guide for fancy little notepads, in the shape of a mini-purse, from Infarrantly Creative. This would make a cute favor for shower or birthday party!

 
Now I'm not suggesting that you go and loot your local hardware store but if you have any of these samples laying around after your next home improvement project, considering holding onto them for one of these ideas.

4.10.2011

No-Sew Projects for Spring

It's finally feeling like Spring in New England and I'm spending my Sunday relaxing. Tomorrow begins the makeover to our bedroom! So after spending the afternoon having some girl time with Beth, I have my work cut out for me to make sure we're ready for construction to start. One of the first craft fairs that I did, oh so many years ago, Beth came and was nice enough to sit with me all day. It was a damp day with many crafters not even bothering to show up so expectations were low but it turned out to be a successful show with lots of laughs and sales. 

We talked about her very first craft project, which was a no-sew fleece blanket for her mom. She loved it so much that she made a couple more as gifts and for herself. Spending time with her today reminded me of that so I thught it was only fitting to post some fun no-sew project links. The fleece blankets are more for winter so here's some fun variations on that idea.

Enjoy the rest of your Sunday!

4.08.2011

How to Make a Diaper Cake

Diaper cakes are a cute and crafty gift, perfect for a mommy-to-be, no matter what gender her bundle of joy will be. My friend Sandy wanted to make one of these and I was more than happy to help her out. Here is a simple tutorial if you would like to try one of these for a pregnant friend or family member. 

This picture of the supplies is not exactly organized but here's the basics on what you will need: 

  • Disposable or cloth diapers; decide how tall you want the cake to be or how much you want to spend, that will determine how many diapers you buy
  • A cardboard base; you can buy cake boards or cut a piece of study cardboard and cover with cute wrapping paper
  • Ribbon; choose your colors based on the gender and make sure to have many different widths 
  • Clear elastic bands to secure rolled diapers
  • Rattles, socks, lotion, pacifiers - extra items for sides of cake
  • Glue gun, tape, scissors, flowers, and wine (for drinking, not decoration!)
  • Cellophane and ribbon for wrapping
The first step is to glue lace around the bottom cardboard base and then start rolling some diapers! 

We used 52 for this cake and it took us about 15 minutes to roll them all. I was initially going to roll them and have Sandy tie them with ribbon but it would have taken too long. A quick trip to the store led us to the clear hair elastics in the picture and still saved about 45 minutes. 

After the diapers are rolled, start lining them up on the base, with the edge facing in, until the outside of the board is covered in a ring of diapers. You may need to use a smidge of rolled tape under each to keep them upright while you are working. We stuffed the center with tissue paper but if you have enough diapers, you can use those to fill the entire circle.

Then, place a slightly smaller cardboard circle on top of the bottom level and repeat the process. We tied some ribbon around the bottom layer while we worked but it's just a temporary hold. The cake isn't sturdy at this point but you can secure it all once the diapers are in place.

Repeat the process from the first layer on the second and third (if applicable). 

If you are using cloth diapers, you will find that as few as 30 will make a full, two tier cake but that will mean your cost could be significantly higher. 

After we finished all three layers and wrapped the layers with thick, wired ribbon with smaller magenta ribbon on top, secured with hot glue, we realized that the top layer was too full (the picture on the side is  the goof-up before we fixed it). There was not enough of a difference between the middle layer and top layer so we simply pulled out one of the diapers from the top layer and pulled the ribbon tight with hot glue for security. Try not to get any glue on the diapers.

 You can see there is one diaper left over in the middle, we used that and the diaper that we removed from the top layer, to hold a bottle of baby lotion in place on top of the cake, creating the illusion of another tier. 

Once we fixed the top layer and positioned the lotion bottle, it was time to adorn the sides of the cake with teeny tiny socks, a package of pacifiers, a rattle (shaped like a diamond ring for the little diva!), small flowers and an adorable star washcloth, with a happy face to celebrate the joyous occasion! 


Of course you will want to cover this cake to protect the diapers, now that they are out of the package. We used rolled cellophane and some ribbon to complete the gift. This also keeps the cake more secure for traveling as well. 


The finished project cost approximately $30 for all the supplies. You can adjust the size of your own cake project based on your own budget. The recipient will certainly appreciate the thoughtfulness of this personalized gift, no matter how much you spend. Happy crafting!

4.05.2011

Crafty Links - Babycakes Approved

It's a rainy Tuesday here in New England but that just means I'll need extra sunny links for the day!
  • This game holder is so cute - and is a great reminder that it's almost camping season! My in-laws are excited for the nice weather & ready to get their camper out from winter storage. Maybe they would appreciate something like this Uno Card Game Holder by Felt So Cute.
Bunch is headed home soon from his networking event so I'm going to go get elbow deep in some Modge Podge! Tomorrow night I will be creating a diaper cake with one of my friends - hoping to have pictures up by the end of the week. 

    4.02.2011

    How to Make Tile Coasters

    This is a re-post of a project that I did a few months ago, printed in its entirety. I wanted to publish both parts together so that it was a complete tutorial that I can share with others. Please feel free to share or link this as well, with proper credit of course :)

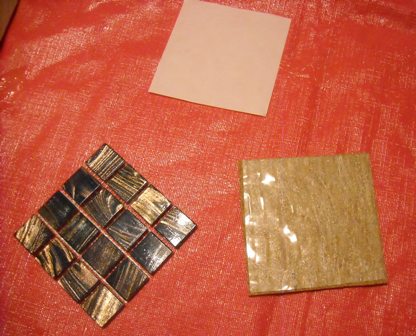
    Here are my supplies, as seen in the picture: 

    • Tiles - any size, any style (the ones I used are 1x1 inch, already spaced - from Home Depot $4.99, in blue & brown)
    • Tile setting mat - sticky plastic to hold the tile in place
    • Cork board - this should be sturdy, as it will be the base of the coaster
    • Grout - any color, feel free to experiment
    • Float - to spread the grout (these can be found at Home Depot)
    • Sponge - to clean off groat after is has dried 
    Not shown:
    • Scissors 
    • Table covering
    • Plastic gloves 


    The first step is to determine how big you want your coasters to be. I decided on 4 x 4 rows, cut that and then cut the tile placement mat and cork backing to match. 


    Then, with the cork on the bottom, line up the tile sticky mat and place that on top to match, finish by securing the tiles to the top, like this: 


    Because we are using the tile placement mat, there is no need to wait between setting the tile and applying grout. For this project, I used a sandstone colored grout. With your gloves on to protect your skin, use your float to start filing in the grids of your coasters. 

    After finishing the top, you'll need to go back and carefully fill in the sides with grout as well. This will require some light sanding after you are done.


    When I was finished with both sets of 4, it was time to let them dry and rest up!


    I made the rookie mistake of leaving the grout on too long but the good news is that it will still come off. The bad news is that the scrubbing required some extra time and elbow grease. 


    Here is one of each of the finished coasters.


    And finally, the finished products which can be found in my Etsy store