4.30.2011

Deal of the Day

I spent the day out and about since Bunch had some work to do and I need a few accessories for a personalized birthday present that I am working on. (I will pictures tomorrow - my deadline is Monday morning) While I was wandering around Joann's, I came across this nifty little sign for my craft room. 


It was all by itself in the back of the store, for only $1.97! I'm not sure if I will paint it a different color or add sparkly spray paint but I scooped it up. I love adding fun home decor finds to our home.

Have you found any fun deals this weekend? 

4.29.2011

Royal Wedding Crafts

I know some people are feeling a little Royal Wedding overload but the big day is finally here! If the wedding is making you feel extra creative today, try some of these fun crafts.

This Kate Middleton cross stitch pattern has been all over the place this week. 


Knit Your Own Royal Wedding

If you happen to be throwing a tea party to celebrate, get inspired by these amazingly decorated cupcakes from The Cupcake Activist.


Hope you enjoy watching all the glamour of the Royal Wedding today!

4.28.2011

Make Your Own Decoupage Bracelets

I've been wanting to try a couple decoupage bangle bracelets for some time now, using both fabric and paper materials. I tried a long time ago by wrapping decorative ribbon around the bracelets and securing it with tacky glue but it just didn't have the effect I was looking for. With one of my friends helping me out, I was finally able to give this project my best efforts.

Here is my supply list, as you will see I didn't use everything in the picture.


  • Plastic or wooden bangle bracelets - I found these on clearance at Old Navy - you can check Michaels also
  • Magazine articles
  • Tissue paper
  • Scissors
  • Modge Podge - goes on white but dries clear 

For the first bracelet, we started with a plastic bangle from Old Navy that had a green strip on the outside and a wide navy strip down the middle. We measured and cut tissue paper strips to be the same width as the wide part only and about 2 inches long. Using Modge Podge and a small paint brush, we glued strips of tissue paper over the navy strip, leaving the green part exposed for a fun contrast. 


Once that was dry, I glued stringed black sequins along the outside edges with Tacky Glue. I let it set for a little while. I've worn it twice already - very happy with the results. 


For the magazine bracelet, we used a thinner plastic bangle and cut-outs from a DIY magazine article about solar living.


Once the paper was fully dry, yes it takes a lot of Modge Podge for paper this thick, I glued on just a few yellow and purple gems. We also lined the inside, to hide any rough edges with a magenta ribbon, set with Modge Podge.


If you are interested in purchasing the bracelets in the photos above, please visit my Etsy store
Tip Junkie handmade projects

4.27.2011

Inexpensive Mother's Day Ideas

Mother's Day is less than two weeks away and let's be honest, mom's love anything that their children make so here are some creative ideas to get you moving!

Find a creative saying or famous quote and make your own card. This card is a good example - I find it to be hysterical personally. (available for purchase from doodlelove on Folksy - she has a ton of amazingly cute cards)


Perhaps you are planning to cook for Mom? Try making Overnight French Toast Casserole from Mommy's Kitchen - how appropriate. This happens to be my mother-in-laws signature dish...


If you are looking to give your mom all the pampering she deserves but without the costly price tag, considering making her a spa basket with homemade body scrub made with Burt's Bees body oil, recipe courtesy of Martha.

Do you have any fun and frugal ways to celebrate mom this year? I would love to hear them - please comment below.

4.26.2011

Crafty Links - Babycakes Approved

It's Tuesday so let's not waste any time and jump into some crafty links!

    As always, please support your local craft community and buy handmade.

    4.25.2011

    Bedroom Renovations Update

    Today marks the start of Week 3 of renovations on our bedroom. The ceiling is done, the painting is almost done and the carpet doesn't come until next week so while we make ourselves comfortable on the other side of the house - here is a picture of our bedroom from the far corner under the windows.


    Bunch is painting the inside of the walk-in as I sit here and type. He is using the same blue paint as the accent wall above. Here's a different view -


    As you can see, the closet is the first door and the other plastic covered door is the master bathroom. On the wall in between, I just bought this from Wallies.com to go above the dresser that sits on the outside of the walk-in. Bunch is hoping it matches, I think it will because the other walls are a calm, muted green.

    And I even managed to find an ivy plant similar to the one in the picture! 


    It's been a little tough getting into any craft projects because of all the confusion with the house being under construction but I'm expecting all of that to change soon. My craft room should be back to normal by the end of the month as well. All good things!

    4.23.2011

    Easter Baking & Candy Making

    Today ended up being a bit more exhausting than I thought it would be! I started that day by recreating this delicious chocolate peanut butter egg candy recipe from All Things Fabulous


    Bunch just cut one open to test it and gave them two-thumbs up. Phew!


    One Easter tradition that I love having? Making pizzelles! Since I used a perfected recipe that has been handed down to me, I can't share that but this is where my afternoon started...


    And this is the finished product. Just need to bag them up for the neighbors and our many stops tomorrow.


    Time to clean up and get ready for a big day of visiting, good night!

    4.22.2011

    Mad Men Spring Floral Arrangement

    And this is what happens when I have the day off and my imagination runs away with me. I'm going to go so far as to say this Mad Men flower arrangement is definitely one-of-a-kind!


    I had the vases left over from our wedding reception centerpieces and the flowers were from an arrangement I got this morning. From left to right, Betty Draper with her pearls and apron on, dashing Don Draper in his suit & tie, Peggy in the middle with her classy, no fuss get-up, and finally Joan in her signature red and dapper Roger Sterling are on the end. It might seem like a waste of time but I had fun and that's all that matters. If you had the day off today, I hope you enjoyed it too!

    4.21.2011

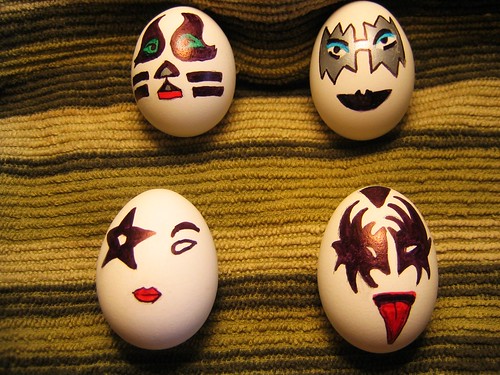
    Handmade KISS Easter Eggs

    All I can say is WOW! 

    kiss  easter eggs
    (photo by Rakka - Flickr)

    These funky little guys give a whole new meaning to decorating Easter eggs!

    4.20.2011

    Homemade Starburst Prom Dress

    The web is a-buzz today with the video of Wisconsin teen, Kerrin Frey, whose mother made her prom dress out of Starburst wrappers. Made from thousands of wrappers over the course of 6 years, this colorful outfit is definitely one-of-a-kind! Lucky for Kerrin, the prom theme just happened to be Candyland!


    4.19.2011

    Crafty Links - Babycakes Approved

    I always look forward to Tuesdays because it's link day and I can share some of the creative projects I've stumbled upon in the last week - 


    As always, support your fellow crafters and buy handmade!

    4.18.2011

    Babycakes Recommends: Wallies.com

    The only thing I love more than finding a new source for craft supplies, is telling everyone I know about it. My latest discovery is Wallies.com - a division of McCall - that sells a wide variety of wallpaper cutouts, for crafts or fun decorations around the home. From their website:

    "Easy to use and offered in a wide variety of styles, these pre-pasted, vinyl-coated wallpaper cutouts are a wonderful way to create great looking accessories and wall décor with just a little water and no artistic talent required. Put them on lamp shades, cabinets, ceramic tiles, tin waste baskets, gift boxes, and, of course walls."

    I placed my first order at the beginning of the year and was so pleased with the products that I told my mother-in-law about the website the same day. She has since placed an order and checks back frequently. The sale items are beyond reasonable, with 25 wallpaper cutouts (3-5 inches each) for only $1.25!

    The first project I tried was with one of my decoupage plates, in a lady bug fabric and a coordinating lady bug wall paper cutout.

    In addition to the ladybugs, I also bought big green bows, moons & stars, lemons, country hearts - the list goes on and on. 

    I would like to point out that I am not affiliated with this company in any way, just recommending it as one crafter to another. 

    Wallies is currently featuring sale items, with some large murals as low as $2. Be sure to check it out. Enjoy!

    4.17.2011

    How to Make Decoupage Fabric Plates

    Today was finally a nice day so I was able to tend to the outside work, like dragging out the patio furniture and raking the front gardens. Before the weekend comes to an end, I wanted to post my full tutorial on how to make decoupage glass plates with cotton fabric. 

    Here's what you will need to complete this project: 

    • Round or square glass plates
    • Cotton fabric, in any design
    • Modge Podge, regular or with glitter
    • Scissors
    • Table covering
    • Paint cans to hold the plates while they dry
    • Matte or gloss clear spray paint


    Start by finding some inexpensive glass plates, either at the consignment store or home goods store. Wash them and dry them completely. Next, cut the fabric about 1-2 inches wider than the plate you are using.

    Put your first plate face down on a paint can and the piece of fabric face down on the table covering. Cover the back of the fabric with Modge Podge, flip it over carefully and cover the front generously as well. Then, lift the fabric off the table and place the design face down so that the design of the fabric is facing out (see picture). Use additional Modge Podge if necessary.

    Use your hands to work out any air bubbles in the fabric, from the center out. Depending on the thickness and texture of the fabric, this may take some time. Move the plate to another paint can to dry thoroughly. Modge Podge goes on white and dries clear so you will be able to tell when it is ready for the next step.

    Repeat for as many plates as you have. I made 3 New York Yankees plates, a gray & pink bird plate, which are both in my Etsy Store and a black striped plate, which didn't turn out the way I wanted and was scraped before the final step. Here is a production picture of them drying.

    Once dry, carefully trim the excess off with a razor blade so that the edge is flush with the plate. (step not shown

    In a well ventilated area, place the plates face down again on the paint cans. Using your clear spray paint, spray the backs of the plates completely. 

    Finally, clean off any excess glue or fingerprints on the front with glass cleaner and paper towels. 

    When you are all finished, your plates should look like this:


    Happy Crafting - feel free to send me a link or picture if you try this project!


    Tip Junkie handmade projects

    4.16.2011

    Simple Paint Chip Projects

    I decided a long time ago that the most fun part of any home improvement project, besides the completion, is picking out paint colors! While I spend the weekend tormenting Bunch with carpet samples and trying to find the perfect accompanying paint shade, I wanted to share some inexpensive paint chip card crafts from some very creative people: 


    Or try this simple Easter garland, a perfect project for kids too! Check out Modern Parents, Messy Kids for more projects for the little ones.


    And finally, here is a project guide for fancy little notepads, in the shape of a mini-purse, from Infarrantly Creative. This would make a cute favor for shower or birthday party!

     
    Now I'm not suggesting that you go and loot your local hardware store but if you have any of these samples laying around after your next home improvement project, considering holding onto them for one of these ideas.

    4.15.2011

    How to Decoupage on Tile

    One of the many unfinished projects that is currently hanging out (and silently mocking me!) in my craft room is a set of decoupage tile drink coasters. I started the project but then ran into uneven sides and my doubt about how to actually finish these little guys! While I try to figure out how I'm going to get those done, I found this great video, from YouTube user 'kaboom989', that shows how to decoupage on tile to make a lovely wall-hanging. This would make a wonderful wedding gift add-on!


    Here is the link for her second video: How to Decoupage on Tile - 2

    And a link for the final video: How to Decoupage on Tile - 3

    4.14.2011

    More Crafty Celebrities

    Last month, I posted a fun list of famous celebrities that take pride in their craft skills, be it knitting or home-made party decorations. I'm pretty sure I made a joke about how celebrities don't hang out at their local Michaels craft stores, but I have been proven wrong!

    I can't believe I left Jennifer Garner off of my first list - not only has she professed her love for Martha but Just Jared has some pictures of her and her daughter picking out craft goodies at Michaels!

    One of my favorite celebrities, Mandy Moore, stopped by Martha's show to craft these adorable charm lockets! Click here for the tutorial.

    Sixth & Springs Books: Celebrity Scarves 2And to prove that not only female celebs enjoying crafting, did you know that David Arquette is rumored to be a skilled knitter

    It seems there is no age limit on a love for knitting, teenage cutie Dakota Fanning has been knitting since she was just a kid. Her IMDB page states that she has made scarves for her leading men co-stars such as Denzel Washington and Tim Robbins!

    Finally, in an attempt to prove that I am not perfect and completely fine with that fact - here is more evidence that the rich & famous shop at Michaels, just like you and me. Now pregnant with their third child, Tori Spelling and Dean McDermott took a trip to the craft store back in 2009, Jennifer Love Hewitt seems to be a big fan, with multiple trips documented and it seems that even the Queen of Pop is all smiles when she leaves with new crafting supplies. 

    Maybe crafty celebs really are just like us?!

    4.13.2011

    Home Project - Bathroom Upgrade

    One of the best qualities my husband has is his handyman capabilities. He'll deny it and tell you that the most work he does with his hands involves a keyboard & mouse. Since we've been together, we have tackled many home improvement projects and I'd like to share our latest. 

    As a present to ourselves, we decided to give our dated first floor bathroom a major overhaul. We had repainted every other room on the first floor, replaced floors and installed a new ceiling. At one point, the bathroom was only a little irksome but with all of the other changes, it was looking increasingly dated. 

    Here are some before pictures; that pale blue toilet became too much for me to handle! We had to replace the seat a couple of years ago (on the day of our wedding reception at the house, of course) and it cost more than a new toilet. I was not sad to see it go...


    For our remodeling project, we did the following things: 
    • New toilet, sink, cabinet and mirror 
    • White decorative chair rail trim (about 36 inches from the floor)
    • Pine trim for floor w/ dark mahogany stain to match cabinet
    • Move wall decor and put up dark wood shelf
    • New lighting fixtures - one for above mirror and one for ceiling  
    • Thin tongue-and-groove wood beams for new ceiling (replacing the popcorn texture - ick) 
    • Dramatic shade of paint for bottom of walls

          We decided to cut down on painting by keeping the top half of the walls the same color as before. The teal-blue color looks striking especially with the dark wood accents. I love it when a plan comes together! 


          Here is the back-splash that inspired my tile coaster project. It was simple to do with the tile-setting mat (Home Depot, $20, 20 sheets) which doesn't require any waiting period before you grout. We were able to do this in about 30 minutes.


          New ceiling and light fixture. These boards were thinner than we've used before so they were easy to cut & install. This part took about 2.5 hours, with Bunch doing the majority of the cutting and nailing, while I acted as queen of the tape measure and assistant. 


          These are the mirror bubbles that were on the wall facing the door. I changed the design and spread them out a bit on the top half of the wall behind the door.


          Speaking of home projects, our bedroom makeover is headed into Day 4 tomorrow with the second coat of tape and compound on the new ceiling. I will be so happy to get rid of the popcorn texture in that room as well. The next fun thing we get to do is pick out paint colors. The new carpet is a tan earthy tone so we have some room to play around. I've got my heart set on a cream colored ceiling with some sort of relaxing shade of green...

          Namaste.

          4.12.2011

          Crafty Links - Babycakes Approved

          I love Tuesdays because not only do I get to check out all of the creations at Tip Junkie's Tip Me Tuesday but it's also the day that I link to some of the amazingly cool projects I have come across lately. Today I'm going to feature some tasty links although I won't be able to make all these projects - bathing suit season is coming!

          • Bunch loves Oreos but I don't know if he's adventurous enough to try these Oreo pancakes. They look pretty delish! (Tizzi Lish)
          • Not only do I work my day job as a geek but I'm also a novice cake-maker so you can see why I am linking to these 13 Geeky Baked Goods, even though the article is a few years old. I could go for some Space Invaders cookies right about now... (Geek Crafts)

          4.11.2011

          Knit the Royal Wedding

          This little video brought a smile to my face, despite the cloudiness outside...


          Any sort of knitting or amigurumi crochet impresses me to no end so I got a kick out of all the characters. That must have been a lot of work! If you have attempted this (or any) Royal Wedding crafts and would like to share with me & my readers, please send me an email or leave a comment. 18 more days!